As previously demonstrated on Windows, here we’ll verify DSCP values using Linux. When implementing application(s) that require QoS such as voice and video, it is critical to verify the integrity of DSCP values. Keep in mind there are many applications, including network devices (such as control plane protocols OSPF and VRRP) that utilize the DSCP field. In this demonstration, we’ll verify DSCP value 46 is being preserved using the Linux terminal and protocol analyzers TCPDump, TShark, and WireShark for CLI/GUI verification.
Keep in mind there are many ways to verify a given value in a PDU, in this case an IPv4 packet header. Since the Internet is full of useful information, we’ll keep a narrow focus by only displaying test traffic that we’re generating. Again, in this case a particular DSCP value.
When using TCPDump or TShark you’ll need to open two terminals, one to generate the traffic and the other to verify it. Once opening the first terminal, enter the ping or man ping (displays the user manual) command.


Per the options, we’ll use the -Q switch to mark the ToS value. Remember the ToS field in an IP header is 1 byte (or 8-bits) and DSCP refers to the first 6-bits in the ToS byte. If you do not yet understand binary it’s helpful to know that multiplying a given DSCP value by 4 gives you the corresponding ToS value. When converting ToS to DSCP, simply take the ToS value and divide by 4. Below are some examples converting DSCP and ToS values:
DSCP 26 (011010) <==> ToS 104 (01101000)
DSCP 46 (101110) <==> ToS 184 (10111000)
DSCP 48 (110000) <==> ToS 192 (11000000)
Once you understand this conversion, it becomes easy to generate the traffic! Now, let’s open a terminal and ping a node to test DSCP values. In Linux the ping command defaults to continuous mode so we can let this test run in the background but remember to terminate it once your finished (Ctrl+C).
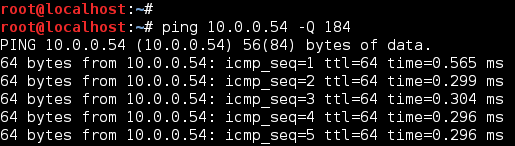
Now that we are generating traffic (ICMP) marked with a ToS/DSCP of 184/46, let’s verify DSCP is preserved using some common protocol analyzers. The following examples focus on displaying ONLY traffic of interest using protocol filter proto[expr:size] and logical operator AND. The main reason for this approach is the local NIC may be sending/receiving hundreds or thousands of PDUs per a second, thus a protocol analyzer without refinement can easily provide too much information! Also, by incorporating protocol filters, this reinforces your knowledge of a given protocol. Remember, there are many tools and techniques to analyze the same traffic so the examples provided simply demonstrate a few different ways to verify DSCP values using Linux.
TCPDump
TCPDump is a protocol analyzer that runs in the CLI and like WireShark, uses the pcap file format. While the examples below rely on the CLI, you could also pipe the TCPDump output to a file and open it with WireShark. In the following TCPDump examples, we use the following switches:
     -i indicates which interface to capture traffic
     -v increases default verbose output (range -v to -vvv)
     ip[1] examines second byte (ToS field) in the IP header
     and logical operator, both protocol filters must match
     icmp[0] examines first byte (Type field) in the ICMP header
The first screen below, uses protocol filters ip[1]==184 and icmp[0]==8, so only ICMP ECHO Requests (Type 8) with ToS/DSCP of 184/46 is dispalyed. The filter matches verify ICMP traffic, marked with ToS/DSCP 184/46 is leaving the local NIC (linux.local) with a destination of 10.0.0.54. Use of logical operator and requires BOTH protocol filters to match. If operator or had been used you might see ICMP traffic regardless of ToS/DSCP value or non-ICMP traffic marked with ToS/DSCP 184/46.
TCPDump ICMP Echo Request Filter
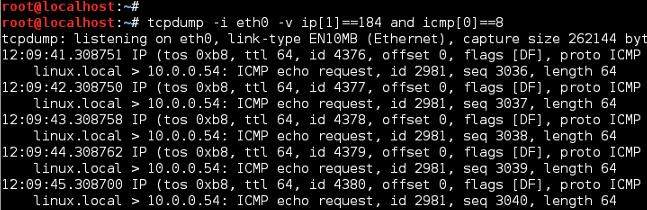
Notice the TCPDump output displays ToS values in HEX, in this case 184 translates to b8. If DSCP was displayed, the HEX value would be 2e (DSCP 46). You can easily find HEX converters online so this is just another way to visually verify what we are testing.
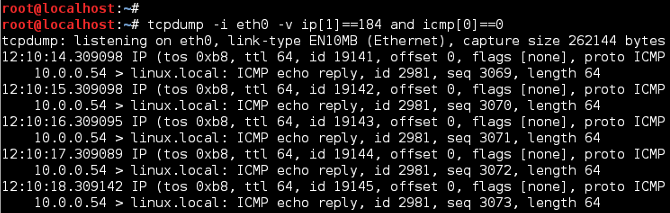
Now, stop TCPDump (Ctrl+C) and change protocol filer to look for ICMP ECHO Replies (Type 0). If TCPDump displays filter matches, this confirms DSCP values are being preserved across the network, between source and destination nodes.
TCPDump ICMP Echo Reply Filter
TShark
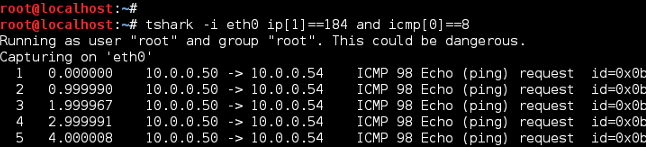
TShark is WireShark’s CLI counterpart, supporting the same options as WireShark. In our case the TShark filter format is similar to TCPDump, with exception to the verbose setting. Again, we’ll filter ICMP ECHO (Request/Reply) traffic marked with a ToS/DSCP of 184/46.
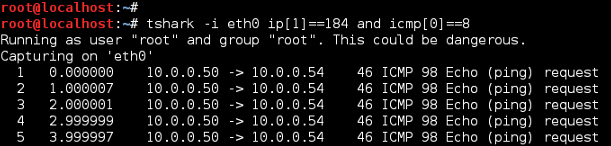
TShark ICMP Echo Request Filter
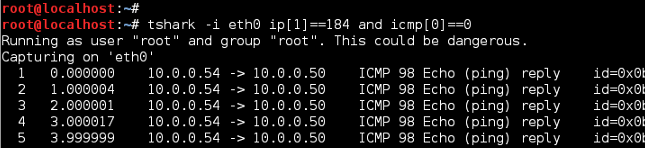
Notice TShark does not display the ToS byte as shown with TCPDump. We can customize this but for now, stop TShark (Ctrl+C) and change protocol filer to look for ICMP ECHO Replies (Type 0). Per the filter matches below, ToS/DSCP of 184/46 is being preserved.
TShark ICMP Echo Reply Filter
If you’re interested in getting full packet details via CLI, use the -V switch shown below. While the verbose option displays a lot of great detail, the output is much more significant!
tshark -i eth0 -V ip[1]==184 and icmp[0]==0
TShark Packet Details

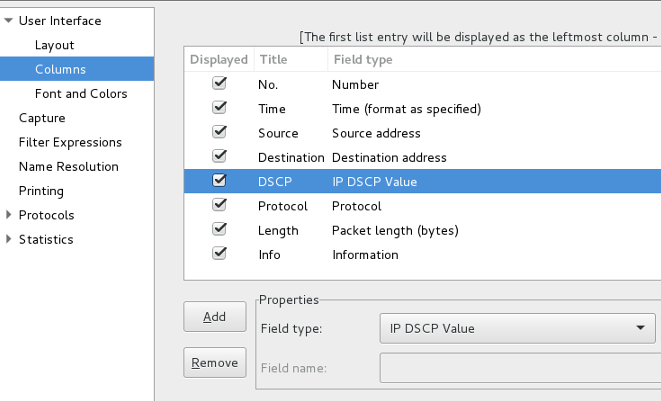
Adding DSCP column to TShark/WireShark
Unlike TCPDump, TShark/WireShark displays the ToS byte as a DSCP value. To display DSCP without verbose enabled, simply add a new column to display IP DSCP values (first 6-bits of the ToS byte). To add a column, open WireShark and select Edit > Preferences… > User Interface > Columns. Next select Add, enter Field name for column name and select Field type: IP DSCP Value. In the example below, the new DSCP column has been moved between Destination and Protocol columns.
Now, if we open TShark and run the same filters the DSCP value is displayed without verbose enabled.
WireShark
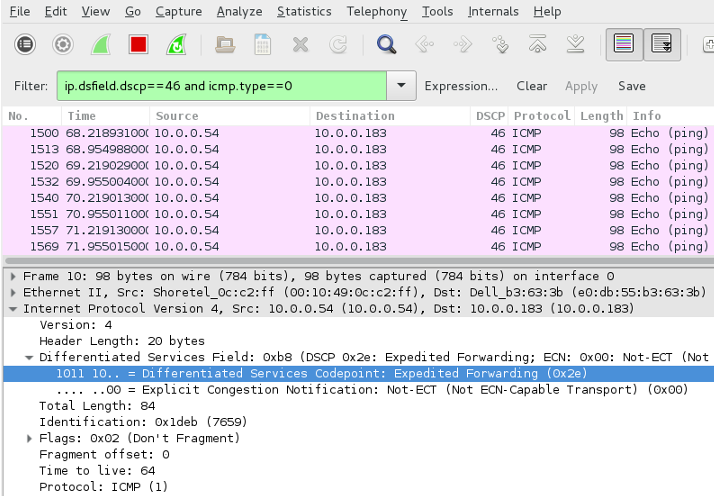
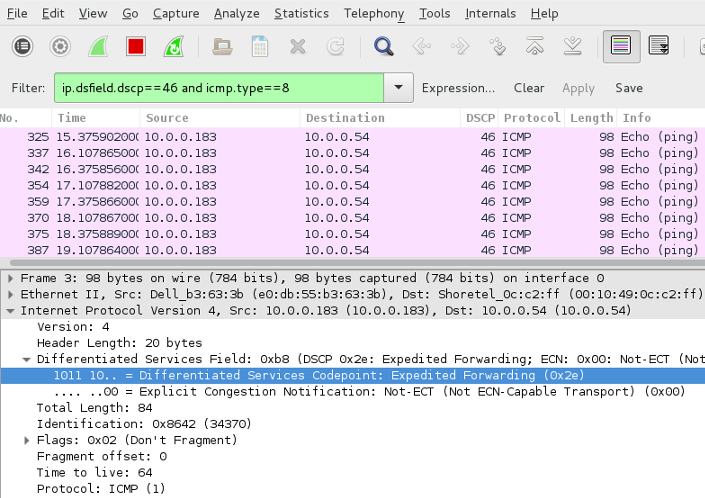
WireShark is a protocol analyzer that comes with a GUI, allowing you to analyze network traffic graphically. As with previous examples, we’ll filter ICMP ECHO (Request/Reply) traffic marked with a ToS/DSCP 184/46. Note, the filter syntax is different from TCPDump, with the ip.dsfield.dscp filter matching traffic based on DSCP values (46 in this case) and the icmp.type filter matching ICMP traffic. The following examples display DSCP values, within the packet capture and now in it’s own column.
TShark ICMP Echo Request Filter
TShark ICMP Echo Reply Filter